
4 DIY Fishing Projects
Whether you’re a budget-conscious angler or just enjoy someone who enjoys DIY, here are four projects that are budget friendly and highly useful. All of the materials used here were readily available in one rather large chain store that shall remain nameless. In fact, if you already own a basic tool set (including a drill, tape measure, saw, and so on), then you can do all four of these projects for less than $35 USD total!
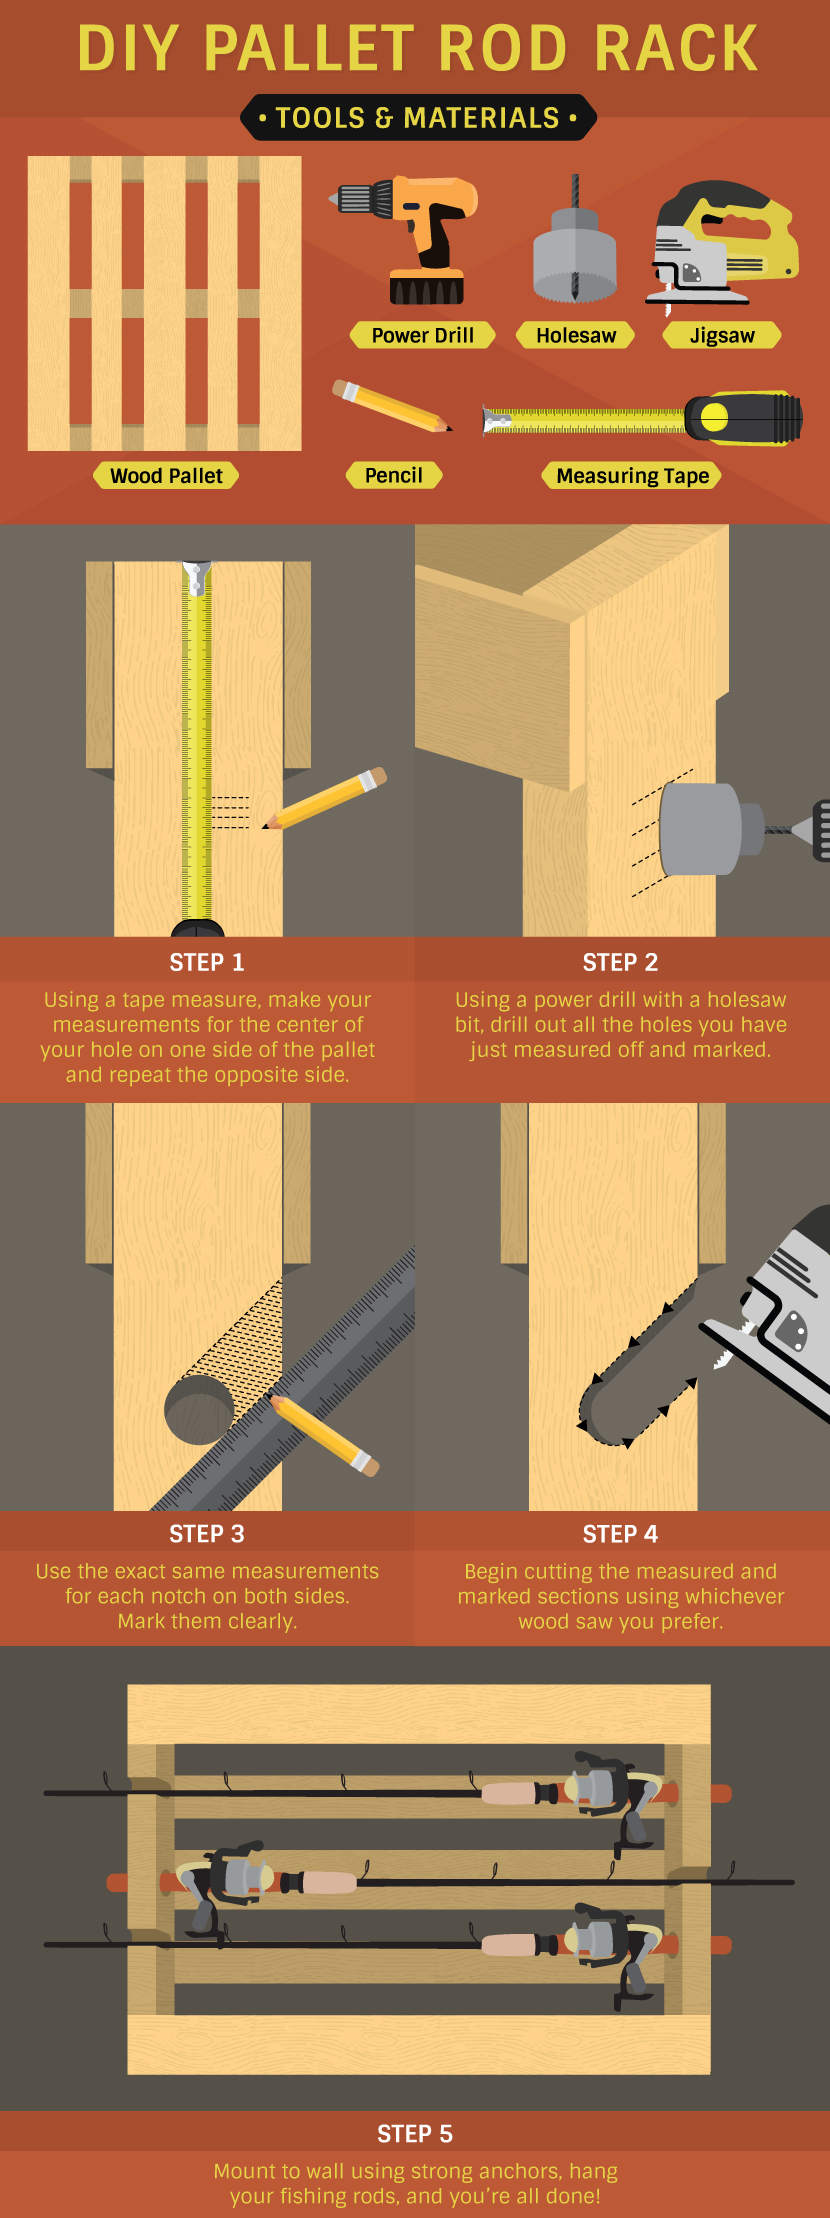
Project 1: Pallet Rod Rack
If you own three or more rods, then you need a safe place to store them. Here’s a fun way to not only keep them safe but also display them. The time to build this project varies greatly depending on the size of the pallet you use, the number of rods you want it to hold, and whether or not you want to do any finish work to the wood, such as sanding, staining, etc. For just a basic rack that holds three rods, it should take about an hour to complete.
Materials needed:
- Pallet
- Hold saw or paddle bit – 1½ inch diameter
- Tape measure
- Drill
- Saw
- Proper safety equipment such as safety goggles and protective gloves
Step 1: Measure out the holes on each side. Plan according to the size of the rods you plan to store, along with the size of their reels if left attached. For larger saltwater rods, you may need to use a larger-diameter hole and greater separation between the rod spaces.
Step 2: Drill out all the holes you have just measured off and marked.
Step 3: On the left-hand side of the pallet, measure out marks to create a notch in the wood. (If you are planning on keeping your reels on the rod and cast with your left hand, make these notches on the right side of the pallet). Be sure to duplicate these measurements for each notch so the angles all look the same once the project is completed.
Step 4: All done! At this point, if there is any additional wood on the pallet that you want to remove before mounting it to the wall, feel free to carefully cut it away. You can also take the time to reinforce any areas of the project that you feel need it with some wood glue. Feel free to sand, stain, and/or paint the piece. Otherwise, fasten it to your wall using strong anchors and start showing off your rods!
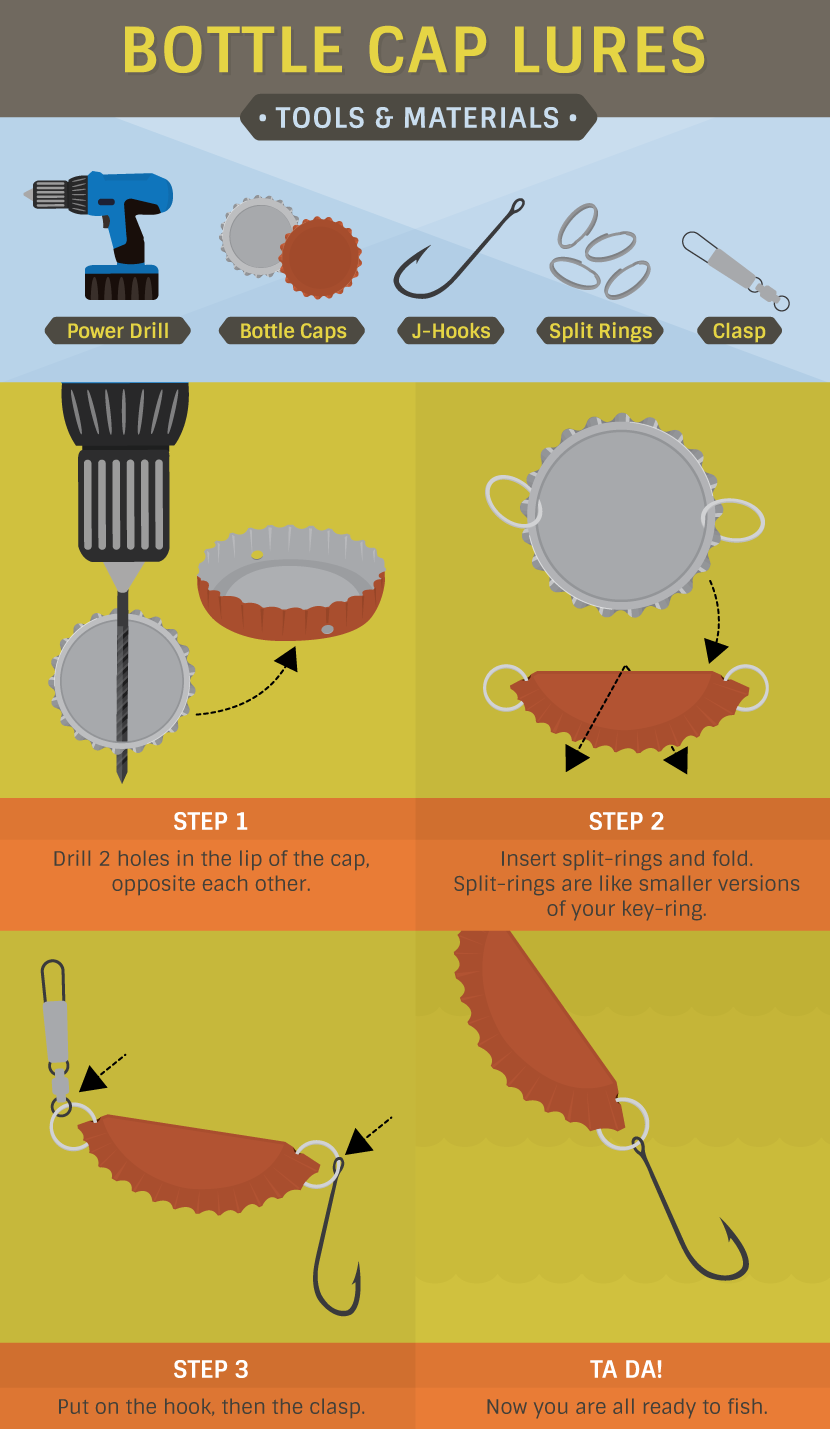
Project 2: Bottle Cap Fishing Lures
This is a fun lure to have in your tackle box to show off to friends, and it’s also highly effective. The movements this lure makes in the water upon retrieval are better than some of the off-the-shelf lures we’ve come to love. These are highly customizable and take anywhere from two to five minutes to make per lure. Depending on the price you pay for the hardware, these lures should cost under $1 each, so you won’t even care if you lose one to a monster fish.
Materials needed:
- Bottle cap
- Ball bearing swivel w/interlocking cap – size 2 or larger
- Split rings – size 4 or larger
- Fishing hook – size 2
- 3/32-inch drill bit & drill
Step 1: Use the 3/32-inch bit to drill two holes in the lip of the cap. It’s important not to drill on the inside surface. If you do drill on the inside surface, you will have too much material in the way once you fold the cap in half.
Step 2: Insert 1 split ring in each hole (two total). These will go on just like keys go on your key ring. One they are in, fold the bottle cap in half using an imaginary line between the two split rings as the centerline.
Step 3: Insert your hook of choice on one split ring, and on the other, insert your ball-bearing swivel with your clasp of choice. You’re now done! Feel free to experiment by adding different beads, feathers, or anything else you can imagine. The sky’s the limit.
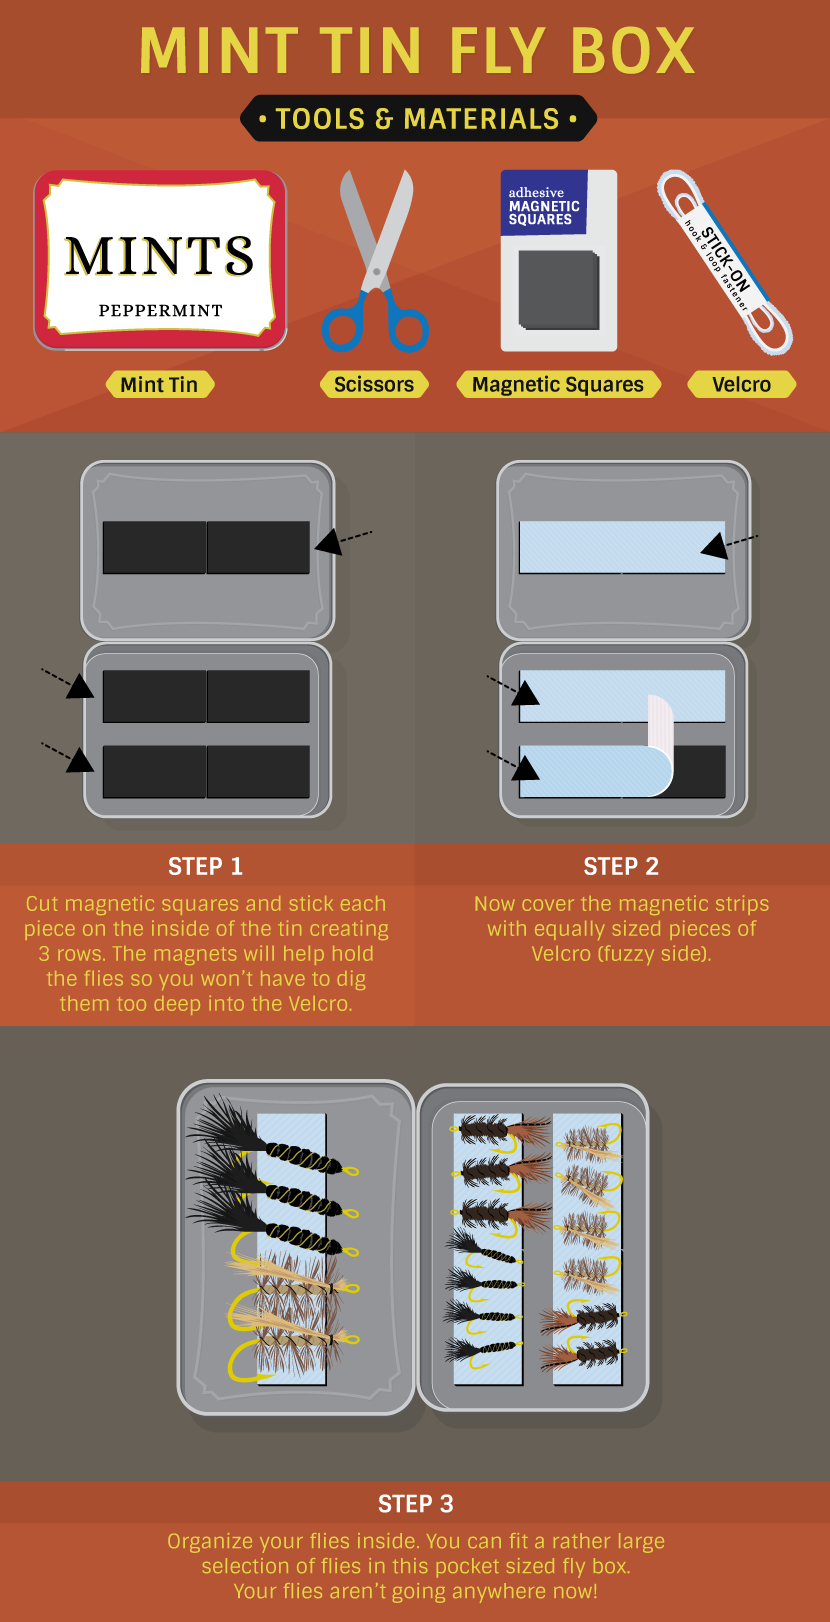
Project 3: Mint Tin Fly Box
Fly boxes are expensive! This one isn’t. It costs less than $4 to make, and it holds flies better than some boxes on the market that cost $20 or more. With the magnets backing the Velcro, you can place a full day’s worth of flies in it, and they will stay secure. This is a must-have if you like hiking small mountain streams and take a minimalist approach on what to bring. This takes only a few minutes to make, so why not make a few and hand them out to friends?
Materials needed:
- Empty mint tin, cleaned
- Adhesive magnetic strips from a craft store
- Adhesive Velcro strips – just the fuzzy part
- Scissors
Step 1: Cut your adhesive magnets to the size and length you desire. Peel off the adhesive backing and place them in the box. Be sure to use adequate pressure to help create a good bond with the adhesive.
Step 2: For this, we need the fuzzy side of the Velcro, not the thick hook side. Peel off the adhesive backing and stick it to the top of each magnetic strip.
Step 3: All done. Now you should be able to securely store a full day’s worth of flies in your top pocket.
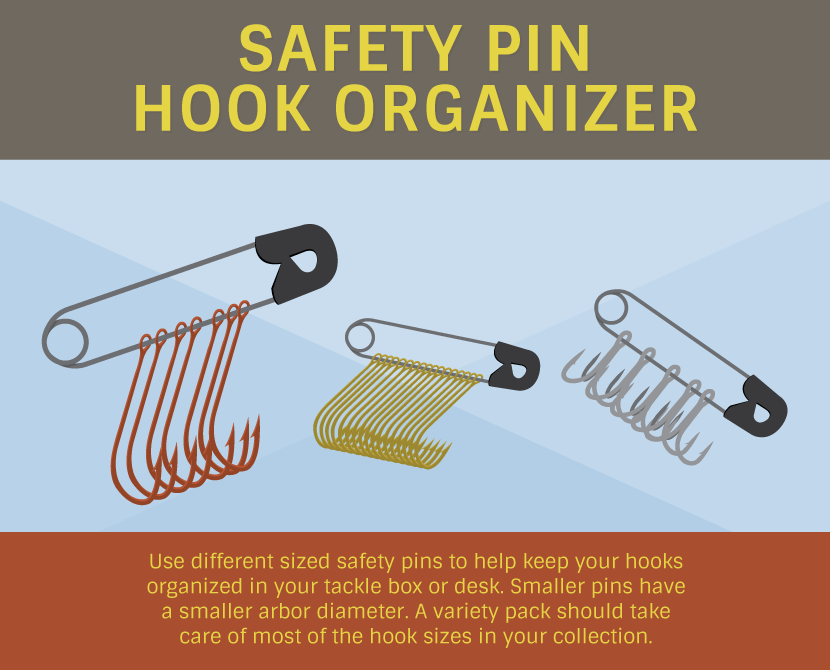
Project 3: Safety Pin Hook Organizer
A quick and simple way to store your hooks for less than $1 is simply to use a safety pin. Use different sized safety pins to help keep your hooks organized in your tackle box or desk. Smaller pins have a smaller arbor diameter and will accommodate the eyelet sizes of commonly used hooks. A variety pack should take care of most of the hook sizes in your collection.
Although killing an afternoon browsing the aisles of your favorite tackle store (whether online or in person) is fun, try spending an afternoon completing one or two of these DIY fishing projects!
Text and graphics provided by Fix and used with permission.